Therefore I do not understand why the Centos people have disabled GPT
support for their latest Centos 5.5 release because almost every modern
server have big raid disks which often are bigger than 2.2 TB so no msdos
partition table can be used here....
They have disabled it because Centos uses an old Grub version which cannot handle
GPT tables thats all....in general the CentOS 5.5 installer called anaconda can install CentOS on GPT tables (as you will see).
But there are ways to fix this limitations on your own.
I first heard about it from Richards blog where he showed a nice way on how to install Centos 5.0 on large GPT partitions because the CentOS 5.0 version did not check for GPT tables
and he uses a patched Grub from the LinuxRescueCD Project to fix the grub (which does not support GPT) installed by centos.
So this just works like a charme in most cases.
But unfortunately Richard's approach didn"t work on my HP proliant DL 380G6 Server. As I need to install Centos 5 on our servers and I could not install Centos5.0 because the smart array raid system build into the server hardware is not supported from the centos5.0 kernel I
just found out another approach on my own on how to install centos5.5 on every machine.
As I am mainly a programmer and not a system administrator it was very easy for me to tweak the anaconda installer routine (installer scripts are written in python) a bit to let me and possible you reading
this install centos5.5 on any gpt tables disk. So tweaking anaconda was the easy part but understanding the anaconda installation cd build process in the first plance, understanding anaconda concepts such as buildstamps, rpm packaging, re-generating new installer and generating a new cd was the harder part for me :-) (I am not a linux guru....yet)
Here is a screenshot of what happens if you try to install Centos > 5.0 on a machine with a GPT partitioning table.
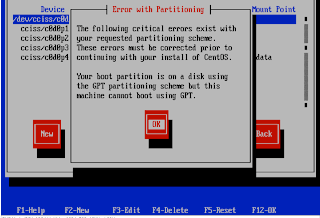
Everything works fine at the begin of the installation but when it comes to partitionating your harddrive the following error occurs:
"The following critical errors exist with your requested partitioning scheme. These errors must be corrected prior to continuing with your install of CentOS. Your boot partition is on a disk using the GPT partitioning scheme but this machine cannot boot using GPT."
and you cannot go on!
So the solution is to get rid of this error message in the anaconda installer by modifing the anaconda installation code.
Here are an overview of the concept and steps I used.
1. First partitionate your GPT harddisk using a linux rescue disk ...(mklabel gpt etc....)
you can read richards blog on how to do this in general.
2. I use a virtualbox environment to hack the centos5.5 installer (anaconda),
you can also use a normal centos5.5 install but for tweaking and hacking
I find a virtual environment more safe as to worki on a real install
as you can mess around without any side-effects.
2a) Install Centos5.5 in a virtual environment or boot up a normal installation.
if you install it new for this purpose, deselect all packages, choose custom
and select:
Development libs, Development tools, Editors...
you only need to install anaconda, a text editor and the squash fs system support..... you do not need more
3) mount the centos5.5 installation cd and modify the anaconda pyhton code
4) rebuild the installation cd...we will create a bootable iso
5) install centos5.5 with the new modified installer...no gpt errors will occur and installation can be made
6) after installation of centos5.5 you will have to patch the grub loader
7) reboot into your new centos5.5 working on a gpt table and enjoy
Here are all the EXACT steps I did.
after booting up a centos5.5 installationand login as root use the following commands:
#some prequisites
#change to homedir first
cd
yum install anaconda anaconda-runtime anaconda-helper
PYTHONPATH=/usr/lib/anaconda
PATH="$PATH:/usr/lib/anaconda-runtime"
#choose your arch: i386 or x86_64
ARCH=x86_64
BUILDBASE=`pwd`
mkdir -p $BUILDBASE/linux/$ARCH/SRPMS
#insert and mount the first centos5.5 install cd in your centos5.5 installation
mkdir /media/cdrom
mount /dev/cdrom /media/cdrom
#make a copy we can edit
rsync -avr /media/cdrom/ $BUILDBASE/linux/$ARCH
#now mount the full anaconda suite from the installation cd into a new directory
mkdir /media/anaconda
mount -o loop -t squashfs $BUILDBASE/linux/$ARCH/images/stage2.img /media/anaconda
#copy the anaconda mount to a place we can edit
mkdir $BUILDBASE/anaconda
rsync -avr /media/anaconda/ $BUILDBASE/anaconda to get rid of the GPT check
#now edit the following anaconda python script file:
emacs $BUILDBASE/anaconda/usr/lib/anaconda/partitions.py
#In the editor go to line:1082 and change:
#After that save and close the editor.
errors.append(
_("Your boot partition is on a disk "
change to=>
warnings.append(
_("Your boot partition is on a disk "
#now back at the shell do:
yum install squashfs-tools
cd $BUILDBASE/anaconda
mksquashfs . ../stage2.img
#backup original stage2
mkdir $BUILDBASE/backup
cp $BUILDBASE/linux/$ARCH/images/stage2.img $BUILDBASE/backup
#now rebuild the cd
DISCINFO=`head -1 $BUILDBASE/linux/$ARCH/.discinfo`
createrepo -u “media://$DISCINFO” -g $BUILDBASE/linux/$ARCH/repodata/comps.xml $BUILDBASE/linux/$ARCH/
#copy the new stage2 we generated to the cd installation
cp $BUILDBASE/anaconda/../stage2.img $BUILDBASE/linux/$ARCH/images/stage2.img
#now make a new iso
ISOFILENAME = $BUILDBASE/c5.5-custom.iso
cd $BUILDBASE/linux/$ARCH
mkisofs -r -R -J -T -v \
-no-emul-boot -boot-load-size 4 -boot-info-table \
-V “Centos 5.5 GPT fix″ -p “Oli P” \
-A “Centos 5.5 GPT fix - 2010/21/09″ \
-b isolinux/isolinux.bin -c isolinux/boot.cat \
-x “lost+found” -o $ISOFILENAME $BUILDBASE/linux/$ARCH
implantisomd5 $ISOFILENAME
#transfer the iso to a place where you can use it in virtual box or burn the cd of it
Now partitionate your GPT harddrive with a Linux resue CD or pmagic linux cd see Richards Blog for an overview
(Install CentOS onto large partitions using gpt disk layout).
#boot the rescue cd
#select your harddrive e.g. /dev/sda or when using pmagic cd: /cciss/c0d0 etc.
#here is my configuration of parted
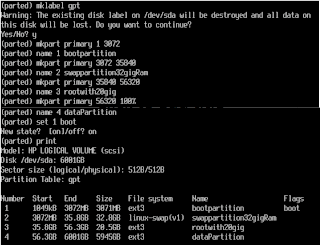
#after setting up partitons quit parted "type q" and in the shell format your new partitions as follow:
mkfs.ext3 /dev/sda1
mkfs.ext3 /dev/sd3
mkswap /dev/sda2
#the last partition "data" will take a long time so pick up a coffee.....
mkfs.ext3 /dev/sda4
reboot and insert the modified Centos 5.5 installer cd.
At the Welcome to CentOS 5.5 screen press OK :-D
Choose Language and keyboard layout.
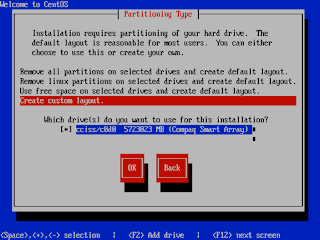
Now at the next screen "Partitioning type" choose "Create custom layout".
Select the partitons and create mount points (/boot,/,/data etc.) but do not chose format, leave this because you have already formatted everything.
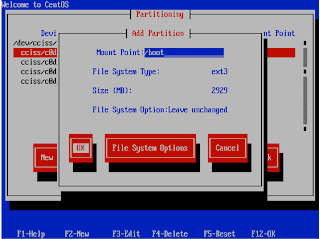
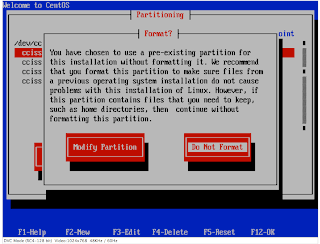
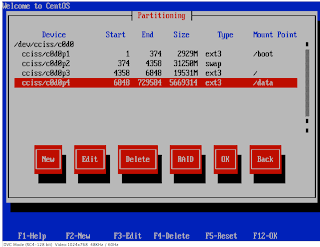
And now the next screen:
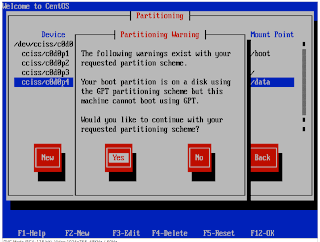
oh no this thing didnt work....did it?
If you watch closely and compare to the original message at the beginning of this document you will see a difference in the heading: it was "Error" no it is "Warning" and we have a "YES" button to continue!!!
Error will stop the installer going any further, warning message can be ignored and you can go on in the installer!!! So click OK NOW!
So you will no longer get the Error that you cannot do this on a GPT table....but instead get a nag screen with a warning only :-) ...successfully hacked...because its a warning only the system let you continue
installing !!!!!
so next steps are to Install Centos:
Next important steps are "Use Grub Boot loader" and after some other steps the next important step is "Boot Loader Configuration".
Question is "Where do you want to install the boot loader?" HEre you have to chose "First sector of boot partition" THIS IS IMPORTANT
DO NOT INSTALL IT IN THE MBR!! WE USE BOOT SO WE CAN FIX IT LATER!!!
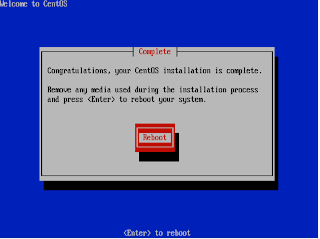
After Installation has finally finished remove Centos5.5 cd and insert RescueCD and reboot to fix the GRUB.
If you boot without fixing grub the boot partition and grub will just not be recognised so you have to do the following steps....
I fixed it using the steps at http://www.rodsbooks.com/gdisk/booting.html (section Linux, GRUB, and LILO) because the instructions at
http://www.sysresccd.org/Sysresccd-Partitioning-EN-The-new-GPT-disk-layout (section Installing a patched Grub-0.97) did not produce fast results.
Here are my commands:
at sysrescue bootup chose your architecture type (I use 64-bit kernel with standards).
Then when you got a shell type:
#instructions from site:http://www.rodsbooks.com/gdisk/booting.html (section Linux, GRUB, and LILO)
#copy the boot partition from the live cd to a safe place
mv /boot /boot_livecd
mkdir /boot
#my boot partition is on sda1 to find out yours: parted with print command
mount /dev/sda1 /boot
#make a backup of grub...in a worst case scenario...always make a copy of this... never just move to grub!
cp -r /boot/grub /boot/grub_original
#edit /boot/grub/devices.map and replace entry "cc0011/c0d0" with "sda"...in general replace your harddisk device name with sda
nano /boot/grub/devices.map
#now install the fixed grub from the rescue cd on your boot partition
grub-install /dev/sda
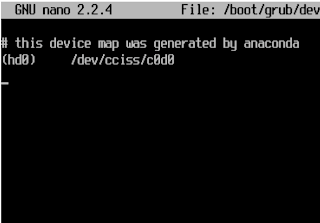
this was the file /boot/grub/devices.map showing before editing
you have to replace your actual device name with sda so in my case the complete new
line will be (without the quotes):
"(hd0) /dev/sda"
after running grub-install you should get the following success status:

reboot....your gpt table will load and finally centos5.5 is working!!!
Note: I can share the modified installer CD on a one-click-hoster if there is high demand for it.
References:
[1] Distribution Hacking 101: disecting anaconda, http://k12linux.mesd.k12.or.us/at/roswell-ltsp.html
[1] Build a custom CentOS 5 install CD, http://www.sirius.pe.kr/v5/tt
[3] Install CentOS onto large partitions using gpt disk layout, http://richardjhblog.wordpress.com/2010/08/25/install-centos-onto-large-partitions-using-gpt-disk-layout/
[4] Booting from GPT (Linux, Grub and Lilo), http://www.rodsbooks.com/gdisk/booting.html