Montag, 4. Januar 2016

Nagios Core 4 service failed on CentOS 7 (EPEL release)

Just a quick post to fix problems with Nagios Core 4 service under CentOS 7.

After installing Nagios Core 4 and making some basic configurations the service cannot be started on CentOS 7.

Full description of the Nagios service:

Name : nagios
Arch : x86_64
Version : 4.0.8
Release : 1.el7

CentOS Linux release 7.2.1511 (Core), yum packages updated today on January 4th, 2016.


Running the nagios.service gives the following error:

systemctl status nagios
● nagios.service - Nagios Network Monitoring
Loaded: loaded (/usr/lib/systemd/system/nagios.service; enabled; vendor preset: disabled)
Active: failed (Result: exit-code) since Mon 2016-01-04 09:32:45 EST; 7min ago
Docs: http://www.nagios.org/documentation
Process: 10738 ExecStart=/usr/sbin/nagios /etc/nagios/nagios.cfg (code=exited, status=1/FAILURE)
Process: 10736 ExecStartPre=/usr/sbin/nagios -v /etc/nagios/nagios.cfg (code=exited, status=0/SUCCESS)
Main PID: 10738 (code=exited, status=1/FAILURE)

Jan 04 09:32:45 localhost.localdomain systemd[1]: Starting Nagios Network Monitoring...
Jan 04 09:32:45 localhost.localdomain systemd[1]: Started Nagios Network Monitoring.
Jan 04 09:32:45 localhost.localdomain systemd[1]: nagios.service: main process exited, code=exited, status=1/FAILURE
Jan 04 09:32:45 localhost.localdomain systemd[1]: Unit nagios.service entered failed state.
Jan 04 09:32:45 localhost.localdomain systemd[1]: nagios.service failed.

Reviewing journalctl I can nail down the problem to:

Jan 04 09:41:25 localhost.localdomain nagios[11123]: Nagios 4.0.8 starting... (PID=11123)
Jan 04 09:41:25 localhost.localdomain nagios[11123]: Local time is Mon Jan 04 09:41:25 EST 2016
Jan 04 09:41:25 localhost.localdomain nagios[11123]: qh: Failed to init socket '/var/log/nagios/rw/nagios.qh'. bind() failed: No such file or directory
Jan 04 09:41:25 localhost.localdomain nagios[11123]: Error: Failed to initialize query handler. Aborting

Doing an Internet search got me to the following solution:
bugzilla.redhat.com

Here is my detailed steps on how to fix this:

What happened?
Currently Nagios EPEL version 4.0.8 refuses to start because it cannot create and access its standard socket file located at /var/log/nagios/rw/nagios.qh due to some missing Nagios SELinux policy rule on CentOS 7.

This should be fixed soon (nagios-4.0.8-2.el7 ?) but until then we need to build our own local Nagios Policy module fix:

Open the following file vi /tmp/nagios-socket.te and put in the following content:
module nagios-socket 1.0;
require {
type nagios_t;
type nagios_log_t;
class sock_file { write create unlink };
class unix_stream_socket connectto;
}
allow nagios_t nagios_log_t:sock_file { write create unlink };
allow nagios_t self:unix_stream_socket connectto;

Afterwards install the policycoreutils-python YUM package if not available already on your system and type the following commands to compile, build and install the new local Nagios policy module before restarting Nagios – which should work afterwards:
yum install policycoreutils-python -y
cd /tmp;checkmodule -M -m -o nagios-socket.mod nagios-socket.te
semodule_package -o nagios-socket.pp -m nagios-socket.mod
semodule -i nagios-socket.pp
install -d -m 755 -o nagios -g nagios /var/log/nagios/rw
systemctl restart nagios && systemctl status nagios

Done!

Donnerstag, 2. Juli 2015

Installing TSM Tivoli Client 6.4 or 7.1 on RHEL7 / CentOS 7 with Failed dependencies: libc.so.6 is needed

Today I got a problems installing TSM Tivoli Client 6.4 and also 7.1 on CentOS 7.
Commands I run
rpm -Uhv gskcrypt64-8.0.14.14.linux.x86_64.rpm
rpm -Uhv gskssl64-8.0.14.14.linux.x86_64.rpm
rpm -Uhv TIVsm-API64.x86_64.rpm
doing than
rpm -Uhv TIVsm-APIcit.x86_64.rpm

gives error message
error: Failed dependencies:
libc.so.6 is needed by TIVsm-APIcit-6.4.0-0.x86_64
libc.so.6(GLIBC_2.0) is needed by TIVsm-APIcit-6.4.0-0.x86_64
libc.so.6(GLIBC_2.1) is needed by TIVsm-APIcit-6.4.0-0.x86_64
libc.so.6(GLIBC_2.1.3) is needed by TIVsm-APIcit-6.4.0-0.x86_64
libc.so.6(GLIBC_2.2) is needed by TIVsm-APIcit-6.4.0-0.x86_64
libc.so.6(GLIBC_2.3) is needed by TIVsm-APIcit-6.4.0-0.x86_64
libc.so.6(GLIBC_2.3.2) is needed by TIVsm-APIcit-6.4.0-0.x86_64
libdl.so.2 is needed by TIVsm-APIcit-6.4.0-0.x86_64
libdl.so.2(GLIBC_2.0) is needed by TIVsm-APIcit-6.4.0-0.x86_64
libdl.so.2(GLIBC_2.1) is needed by TIVsm-APIcit-6.4.0-0.x86_64
libgcc_s.so.1 is needed by TIVsm-APIcit-6.4.0-0.x86_64
libgcc_s.so.1(GCC_3.0) is needed by TIVsm-APIcit-6.4.0-0.x86_64
libgcc_s.so.1(GLIBC_2.0) is needed by TIVsm-APIcit-6.4.0-0.x86_64
libm.so.6 is needed by TIVsm-APIcit-6.4.0-0.x86_64
libnsl.so.1 is needed by TIVsm-APIcit-6.4.0-0.x86_64
libpthread.so.0 is needed by TIVsm-APIcit-6.4.0-0.x86_64
libpthread.so.0(GLIBC_2.0) is needed by TIVsm-APIcit-6.4.0-0.x86_64
libpthread.so.0(GLIBC_2.1) is needed by TIVsm-APIcit-6.4.0-0.x86_64
libpthread.so.0(GLIBC_2.2) is needed by TIVsm-APIcit-6.4.0-0.x86_64
libpthread.so.0(GLIBC_2.3.2) is needed by TIVsm-APIcit-6.4.0-0.x86_64
libstdc++.so.5 is needed by TIVsm-APIcit-6.4.0-0.x86_64
libstdc++.so.5(CXXABI_1.2) is needed by TIVsm-APIcit-6.4.0-0.x86_64
libstdc++.so.5(GLIBCPP_3.2) is needed by TIVsm-APIcit-6.4.0-0.x86_64
libstdc++.so.5(GLIBCPP_3.2.2) is needed by TIVsm-APIcit-6.4.0-0.x86_64
and after resolving first error I got
libgcc_s.so.1 is needed
...
and than I got
libstdc++.so.5 is needed
...
this also is true for trying tsm tivoli 7.1 client version
Solution was to install missing Linux 32-bit libraries [1] as tsm relies on them
yum install libgcc.i686
yum install libstdc++.i686
yum install compat-libstdc++-33-3.2.3-72.el7.i686


sources
[1] http://www-01.ibm.com/support/docview.wss?uid=swg21608859

Montag, 29. Juni 2015

Fixing installation errors for installing CentOS 7 on Mac Mini 2011 with USB media

This morning I tried to install CentOS7 on an Apple MacMini from 2011 with a USB stick. After grub and the initram fs has been loading there was the following error
dracut-initqueue[639]: Warning: Could not boot. dracut-initqueue[639]: Warning: /dev/root does not exist. Starting Dracut Emergency shell.
This error often occurs by a mismatched usb media label and can easily be resolved by using UUID instead of label in grub2 initram fs kernel arguments [1].

The following steps have been taken form unix stackexchange on how to fix this:

1. starting from the Dracut Emergency shell, find out which device name is your installation usb stick.
2. get the uuid for this device name, write it down.
3. reboot and replace grub2 initram fs kernel arguments from using LABEL to UUID.
The exact procedure can be found here

4. start the installation with the changed kernel arguments, this is a bit tricky because running a changed grub2 command line needs the keyboard combination ctrl-x which does not work on a mac computer [2].
This also does not work when using a PC keyboard on this mac.
Solution was to use a PC keyboard and type F10 instead of CTRL-X work the same on mac to run a changed command line. I tried pressing F10 on a mac keyboard (fn+F10 key) but did not work.
But using a PC keyboard on the mac and hitting F10 worked and booted up the graphical installer.


sources:
[1] http://unix.stackexchange.com/a/209515
[2] https://bugs.launchpad.net/ubuntu/+source/grub2/+bug/722950

Montag, 11. Mai 2015

Resolving DRBD error lk_bdev_save (/var/lib/drbd/drbd-minor-0.lkbd) failed: No such file or directory on centos 7 system

Hi everyone! Just a small post here because I have not found anything about this error on the web (at least not on a english-speaking website ;) ) I recently installed and configured drbd on a centos 7 machine. drbdadm came in version 8.9.2 (api:1) GIT-hash: de9236084d57a09160b366e5fdf5b481c5cc163d build by mockbuild@, 2015-04-10 06:40:59 when I tried to create my resource I got the following error
$drbdadm create-md drbd01
error msg:
initializing activity log
NOT initializing bitmap
Writing meta data...
lk_bdev_save(/var/lib/drbd/drbd-minor-0.lkbd) failed: No such file or directory
New drbd meta data block successfully created.
lk_bdev_save(/var/lib/drbd/drbd-minor-0.lkbd) failed: No such file or directory
searching the internet I found nothing about it so I just looked at the error and resolved it using
mkdir /var/lib/drbd/
I think the rpm package from ELRepo I installed just missed that command. Hope this helps anyone

Mittwoch, 13. August 2014

How to install Ubuntu 14.04 on an old Macbook 2.1 EFI.

UPDATE on 13/3/2015: this instruction method is no longer valid for newer Ubuntu versions > 14.04 (e.g. 14.10)! I will write a follow up soon on this you can find here. There are lots of instructions and tutorials out there on how to install Ubuntu on Mac computers. Most dont work as stated (mostly because it is not easy to make a bootable ubuntu usb boot stick with a mac), so I wrote this tutorial which I think is the most easy one out there!

This post is basically just a short reminder for myself on how to install Ubuntu 14.04 on Macbook 2.1 EFI. Maybe it is useful for other people as well.

Requirement/Prequesites:

Macbook with Mac Os X >=10.6, the full harddisk is occupied by Mac Os X.

1. start Mac Os X, open Disk utility, shrink Mac Os X partition so much that you can create another two partitions, one for Linux root with at least 30 gb and another one for swap, rule of thumb: available RAM memory equals two. For me it was 2 gb * 2 = 4 gb. Choose Mac Os X journaling as filesystem for the new two partitions.
2. After partitioning you should now have three partitions, my setup was 65 gb total (SSD): 30 gb for Mac Os X, 30 gb for Linux (root paritions), 4 gb for the swap partition
3. Install rEFIt, power off computer (do not just restart) to see if rEFIt logo is booting up, if not try again powering off.
4. Boot back into Mac Os X and download Ubuntu 14.04 64 bit AMD for Mac ISO
5. download ISO2USB-Efi-Loader and prepare an USB stick with the ISO from step 3 (details here: here (in german) use the boot64bit efi file on the stick. Use google translate if you cannot understand German.
6. reboot and use the Mac ´ALT´ key during startup and choose the usb-efi stick
7. install ubuntu, choose ´something else´ as the installation type, then use the linux root partition from step 1. (mine is called /dev/sda4) and format it as ext4 and select root (/). Also define the swap partition from step 1. Most importantly in this step is to select the root parititon for the boot loader (e.g. /dev/sda4) but never NEVER use the whole disk for installation of it!!! (never use the full disk e.g. /dev/sda use a partition e.g. /dev/sda4)
8. at the end of the installation the installer says it cant install the bootloader at /dev/sda4, click on ´ignore this and continue installation´ (dont install on /dev/sda - the full disk etc.)
9. after successfully install ubuntu, click on ´test live system´
10. prepare a boot-repair-disk on your usb stick, install boot-repair as stated here (on a usb stick!, you can download the iso and use it similar to step 5 here), reboot and start the stick than click on ´Recommended repair´
11. done! reboot. now a tux symbol will appear at the rEFIt boot menue. Click on it to start ubuntu!

Dienstag, 11. Februar 2014

Fixing package installation problems 'failed to install' in Architect (architect 0.9.3-10) under Ubuntu 12.04

Fixing package installation problems 'failed to install' in Architect 0.9.3-10 under Ubuntu 12.04

for a project I needed "trace into debugging" functionalities in R so I installed the architect 0.9.3-10 deb package within Ubuntu 12.04 using the following instruction which is a standalone eclipse built using the StatEt plugin

started the program, switched in the Embedded R.3.0.2 console typed

source("http://bioconductor.org/biocLite.R") 
to install some additional packages I needed for debugging a specific project

got following error

The downloaded source packages are in
 ‘/tmp/RtmpU46P2P/downloaded_packages’
'biocLite.R' failed to install 'BiocInstaller', use
  'install.packages("BiocInstaller",
  repos="http://www.bioconductor.org/packages/2.13/bioc")'
Warning message:
In install.packages("BiocInstaller", repos = a["BioCsoft", "URL"]) :
  installation of package ‘BiocInstaller’ had non-zero exit status

also tried out the suggested install.packages("BiocInstaller",repos="http://www.bioconductor.org/packages/2.13/bioc") which did not work either

someone suggested that the solution is running R in administrative mode in order to install packages, so I wrote down the R_HOME path from within R

 > R.home()
[1] "/opt/architect/stable/20131204221312/plugins/eu.openanalytics.architect.r.server.gtk.linux.x86_64_0.9.3.201310150807/R"

open a terminal and login as root

$ sudo su
# set R path  extracted from R (R.home()) for convenience 
$ export MY_R="/opt/architect/stable/20131204221312/plugins/eu.openanalytics.architect.r.server.gtk.linux.x86_64_0.9.3.201310150807/R"
$ cd $MY_R
#run the command line R
$ ./bin/R

got me the following error

./bin/R: line 236: /opt/architect/architect-stable/plugins/eu.openanalytics.architect.r.server.gtk.linux_stable/R/etc/ldpaths: No such file or directory
ERROR: R_HOME ('/opt/architect/architect-stable/plugins/eu.openanalytics.architect.r.server.gtk.linux_stable/R') not found

i opened the R shell command and saw that it sets R_HOME_DIR in line 4

$ less bin/R
# line 4: R_HOME_DIR="/opt/architect/architect-stable/plugins/eu.openanalytics.architect.r.server.gtk.linux_stable/R"

if i do a

ls  /opt/architect/architect-stable/plugins/eu.openanalytics.architect.r.server.gtk.linux_stable/

i got a

No such file or directory error

if i do a

ls -al  /opt/architect/architect-stable/plugins/eu.openanalytics.architect.r.server.gtk.linux_stable

i see that the dynamic link is misplaced

 -> /opt/architect/stable/20131204221312/plugins/eu.openanalytics.architect.r.server.gtk.linux_0.9.3.201310150807 

which does not exist!!!

the right one can be found in the directory /opt/architect/stable/20131204221312/plugins/

/opt/architect/stable/20131204221312/plugins/eu.openanalytics.architect.r.server.gtk.linux.x86_64_0.9.3.201310150807

if you compare both, you see that the correct one has the substring 'x86_64' which the wrong one did not have, so there seems something was wrong with a command such as 'uname' (maybe they used a parameter for uname which was not available on all platforms etc. when generating the script)

to fix this remove dynamic link

rm /opt/architect/architect-stable/plugins/eu.openanalytics.architect.r.server.gtk.linux_stable 

and point to true location

ln -s /opt/architect/stable/20131204221312/plugins/eu.openanalytics.architect.r.server.gtk.linux.x86_64_0.9.3.201310150807 /opt/architect/architect-stable/plugins/eu.openanalytics.architect.r.server.gtk.linux_stable

afterwards R is running fine and I can install what I want e.g. using source("http://bioconductor.org/biocLite.R") command

$ bin/R

Result:
R version 3.0.2 (2013-09-25) -- "Frisbee Sailing"
Copyright (C) 2013 The R Foundation for Statistical Computing
Platform: x86_64-unknown-linux-gnu (64-bit)

R is free software and comes with ABSOLUTELY NO WARRANTY.
You are welcome to redistribute it under certain conditions.
Type 'license()' or 'licence()' for distribution details.

  Natural language support but running in an English locale

R is a collaborative project with many contributors.
Type 'contributors()' for more information and
'citation()' on how to cite R or R packages in publications.

Type 'demo()' for some demos, 'help()' for on-line help, or
'help.start()' for an HTML browser interface to help.
Type 'q()' to quit R.

> biocLite("cellHTS2")

now I can install all my needed packages from the command line using sudo rights!

Samstag, 1. Dezember 2012

Move an existing Apple Mac Os X Installation from an iMac to White Macbook (Moving installation to different Hardware)

Since we had some hardware related issues with an iMac model 2008 we had to bring it to the Apple customer service. As I knew this take some times after they got it fixed but we needed it at work I tried to migrate the existing iMac Lion installation to a white Macbook, both models from 2008.
I thought this would be easy because both have similar hardware and are both from 2008.
After using Disk Utility to create a complete dump from the existing iMac installation I transferred this image to the Macbook but it did not boot. It brought a "Question Mark folder icon" or the "Stop/Prohibitory sign" at boot up and stopped there. After booting into Single User Mode I learned that it was stuck at the error message:
IOBluetoothHCIController
So I thought maybe the iMac has a bluetooth controller which has been installed into the OS but the white macbook don't so I deleted the kext file but still not booting with the following error message appeared:
'could not find driver for platform AHCI'.
So I thought maybe the kernel extensions are not compatible or the kernel is different...
Messing around with mach_kernels and /System/Library/Extension folder It got me nowhere and I lost a whole business day with no results.
So I tried different things but in the end I found the following solution:
The iMac Lion installation was a very early one 10.7.1 and was never really updated. Also I taught that maybe I have to clean up all the systems caches because the hardware seems to be really different.
So first thing I updated the iMac Lion installation to the latest Mac Os X 10.7.5 and updated all software trough the "Software Updates" program. Then I installed CCleaner and deleted all unnecessary files, languages and repaired the permissions. Then I zeroed out the free space in order to get a smaller dmg. After that I installed Onyx and cleaned out all the system caches (Kernel, Boot, etc). I repaired the permissions with this program once again. After that I created the dmg dump using Disk Utility again and installed it on the white macbook. And it worked! Now it booted up nicely and works 100%.
So in the end I think it was due to some cache files which were still there from the iMac or maybe just the old operating system number.
So what I have learned is if you want to transfer/migrate an existing OS X
installation from one mac to another tidy up the system first!!!

Donnerstag, 22. November 2012

Installation of Adobe Creative Suite CS5.5 failed on Mac Os X 10.7 Lion because of Font problems

Today I had to install Adobe Creative Suite CS 5.5 at work for some of my colleague on a Mac Os X 10.7 Lion system . He came to me after trying out the Trial version of CS5 on his own and since our company now has official licences for the full CS5.5, he asked me if I can help him install it because the Installer produced some kind of errors.
I could help him fix those problems and since I haven't found any useful information about this on the net, I write down what I did in case someone finds it useful.
So first thing I tested out was the "Adobe Creative Suite Cleaner Tool" here. The installer dialog said: "Installation failed" and "unknown error occured" or in German "Installation fehlgeschlagen", "Ein unbekannter Installationsfehler ist aufgetreten". It happened for all CS products: PS Photoshop,Illustrator and Indesign.
So I took a look into the log files at "/Library/Logs/Adobe/Installers/" and found these suspicious lines:
 [...]  
 DF054: Unable to read Adobe file version for file path '/Library/Fonts/MinionPro-Medium.otf'(Seq 46)  
 DF024: Unable to preserve original file at "/Library/Fonts/MinionPro-Medium.otf" Error 0(Seq 46)  
 DF054: Unable to read Adobe file version for file path '/Library/Fonts/MinionPro-It.otf'(Seq 31)  
 DF024: Unable to preserve original file at "/Library/Fonts/MinionPro-It.otf" Error 0(Seq 31)  
 WARNING: DF054: Unable to read Adobe file version for file path '/Library/Fonts/MinionPro-Medium.otf'(Seq 46)  
 ERROR: DF024: Unable to preserve original file at "/Library/Fonts/MinionPro-Medium.otf" Error 0(Seq 46)  
 WARNING: DF054: Unable to read Adobe file version for file path '/Library/Fonts/MinionPro-It.otf'(Seq 31)  
 ERROR: DF024: Unable to preserve original file at "/Library/Fonts/MinionPro-It.otf" Error 0(Seq 31)  
 b110-imac18:src oliverpelz$ grep otf ~/Desktop/Adobe\ Photoshop\ CS5.1\ 12.1\ 11-21-2012   
 DF054: Unable to read Adobe file version for file path '/Library/Fonts/MinionPro-Medium.otf'(Seq 46)  
 DF024: Unable to preserve original file at "/Library/Fonts/MinionPro-Medium.otf" Error 0(Seq 46)  
 DF054: Unable to read Adobe file version for file path '/Library/Fonts/MinionPro-It.otf'(Seq 31)  
 DF024: Unable to preserve original file at "/Library/Fonts/MinionPro-It.otf" Error 0(Seq 31)  
 WARNING: DF054: Unable to read Adobe file version for file path '/Library/Fonts/MinionPro-Medium.otf'(Seq 46)  
 ERROR: DF024: Unable to preserve original file at "/Library/Fonts/MinionPro-Medium.otf" Error 0(Seq 46)  
 WARNING: DF054: Unable to read Adobe file version for file path '/Library/Fonts/MinionPro-It.otf'(Seq 31)  
 ERROR: DF024: Unable to preserve original file at "/Library/Fonts/MinionPro-It.otf" Error 0(Seq 31)  
 [..]  
So after some messing around with DiskUtilitys-File Permission repair tool, chmodding /Library/Fonts and single Fonts etc. and moving around those files above I could not get it to install properly.
So in the end the solution was to completely move the Fonts folder around, so it cannot be accessed during installation, then start the installation and after it has installed everything correctly copy all the Fonts back.
!!A word of caution: Be careful with those commands, I will not take responsibility if you wreck your Mac installation, you have to know what you do:
 
 $mkdir ~/Desktop/Fonts-Backup;  
 $sudo mv /Library/Fonts ~/Desktop/Fonts-Backup/  
 # now install adobe ... after installation is done do the following thing:
 $sudo mv /Library/Fonts ~/Desktop/Fonts-Backup-Adobe-fresh-installed 
 $sudo rsync -rav ~/Desktop/Fonts-Backup/Fonts /Library/ 

In the end I think the problem was that the trial version installed the fonts listed above but did something wrong with file permissions. The Adobe deinstaller did not remove those files so that it is fair enough to say that the Deinstaller does not remove 100% of the Adobe installations.

Montag, 22. August 2011

How to debug Linux Init Scripts (in Ubuntu) which fail at bootime

How to debug Linux Init Scripts (Ubuntu).

Often you have the problem that you hacked an init script or have to modify an existing one which will work whenever you manually start it but the process seems not be there after rebooting.

The problem is that your system is not in normal "user mode" during bootime but uses a slim version of your system. For example in most cases for me it is always that my script relies on environment variables such those I usally set in /etc/environment which are loaded after executing the init scripts.

But here is my actual troubleshooting for init scripts which dont work at bootime (manually executing often works):

1) you havent set up any runlevels for your script (solution: update-rc.d)
2) you havent made them executable (solution: chmod +x)
3) your script relies on environment variables which are not set at this stage of bootime
4) your script also does not work at manually running - this meens you have general problems with it - script ERRORS -use bashdb tool

So what to do if it does not run at bootime but runs manually?

Answer: simulate a bootime environment. You can do this by using the env command [1]

cd /
env -i LANG="$LANG" PATH="$PATH" TERM="$TERM" /etc/init.d/daemon start

this simulates the absolut exact situation which are at boottime!!!!

But often if you run modern scripts it does not output anything also you run it in a bootime-like environment.
So what I usally do I use the bashdebugger bashdb tool [2]. In Ubuntu it is easy to install because it is in the repository under "bashdb".

So now I run the full thing like


cd /
env -i LANG="$LANG" PATH="$PATH" TERM="$TERM" bashdb /etc/init.d/daemon start

and it works like a charme to see whats going on.

Often now I can trace down errors but in some cases it was not possible to get the errornous output. Often this is because the error lies in lines which contain the "start-stop-daemon" program which often modern init scripts rely on. But a solution is near [3]. Just single step to the line in bashdb which contains the start-stop-daemon execution and print it out in the shell e.g. the line is called:


"start-stop-daemon -S -p/var/run/jetty.pid -cjetty -d/path/to/solr -b -m -a /usr/bin/java -- -Dsolr.solr.home=/path/to/solr/solr -Djetty.logs=/path/to/solr/logs -Djetty.home=/path/to/solr -Djava.io.tmpdir=/tmp -jar /path/to/solr/start.jar --daemon"

so in bashdb i hop to the line, hold on at there and use the command "x" :

x start-stop-daemon -S -p"$JETTY_PID" $CH_USER -d"$JETTY_HOME" -b -m -a "$JAVA" -- "${RUN_ARGS[@]}" --daemon

and it will print me out the translated string code:

sudo start-stop-daemon -S -p/var/run/jetty.pid -cjetty -d/path/to/solr -v -b -m -a /usr/bin/java -- -Dsolr.solr.home=/path/to/solr/solr -Djetty.logs=/path/to/solr/logs -Djetty.home=/path/to/solr -Djava.io.tmpdir=/tmp -jar /path/to/solr/start.jar --daemon

so I usally just execut this line then in the shell but often I cannot see any output again:-(. But using this blogpost here [3] I see that I have to get rid of the -b parameter in order to see the output.

sudo start-stop-daemon -S -p/var/run/jetty.pid -cjetty -d/path/to/solr -v -m -a /usr/bin/java -- -Dsolr.solr.home=/path/to/solr/solr -Djetty.logs=/path/to/solr/logs -Djetty.home=/path/to/solr -Djava.io.tmpdir=/tmp -jar /path/to/solr/start.jar --daemon

So in my case the JAVA_HOME was set in /etc/environment but could not be seen by this script so it did not know where JAVA_HOME was. So I putted the JAVA_HOME path in the top of the init script and everything worked fine then.


[1] http://stackoverflow.com/questions/1421607/erlang-daemon-init-d-script-fails-to-start
[2] http://bashdb.sourceforge.net/
[3] http://greenash.net.au/thoughts/2011/02/solr-jetty-and-daemons-debugging-jettysh/

Mittwoch, 3. August 2011

Installing jetty hightide 7.4.5 under Ubuntu 10.04.3 LTS (Lucid Lynx) with port 80 support (setuid)

Installing jetty hightide 7.4.5 under Ubuntu 10.04.3 LTS (Lucid Lynx) with port 80 support (setuid)

Since I needed an javax.servlet container on our brand new vServer setup and tomcat needs too much resources in my opinion
I wanted to install jetty on this clean ubuntu LTS system.
So I installed jetty6 from package with "apt-get install jetty". After a bit of configuring the /etc/default/jetty it was
working like a charme but I couldn't get it run on port 80 because my vServer kernel (openvz) did not support NAT out of the box
for port forwarding and also I did not want to install apache2 for port forwarding because apache2 would also be needing some amount
of memory and since our resources are limited and I need the full power/memory for all the other server applications (mysql etc.) I searched
for a alternative. So jetty hightide to the rescue!
Jetty 7 hightide has a new feature called setuid so one can run the webserver with normal user under port 80!!!
Since I did not find any useful FULL description on how to get it to run I decided to write my own. My basic idea comes from website [1] and
since I needed to find out why things were not working I found this beautiful blog entry [2]
So here are my details to install the latest jetty 7 under Lucid Lynx server:


#login with your root account on server
#first lets make an update
apt-get update
#ok my openvz system did not even had these "standard" programs :-D...
#install java
# open /etc/apt/sources.list and put in:
deb http://archive.canonical.com/ubuntu lucid partner
deb-src http://archive.canonical.com/ubuntu lucid partner
#so we can install java
apt-get install less wget unzip sun-java6-jdk
#make your shell aware of java: open /etc/environment and alter line:PATH="/usr/local/sbin:/usr/local/bin:/usr/sbin:/usr/bin:/sbin:/bin:/usr/games"
#put in:
PATH="/usr/local/sbin:/usr/local/bin:/usr/sbin:/usr/bin:/sbin:/bin:/usr/games:/usr/lib/jvm/java-6-sun"
#add the line:
JAVA_HOME=/usr/lib/jvm/java-6-sun

#download latest jetty hightide from codehaus

wget http://dist.codehaus.org/jetty/jetty-hightide-7.4.5/jetty-hightide-7.4.5.v20110725.zip
unzip jetty-hightide-7.4.5.v20110725.zip
#copy the start script to the init scripts so it will later run on server startup
cp jetty-hightide-7.4.5.v20110725/bin/jetty.sh /etc/init.d/jetty
#move the jetty to system dir
mkdir /opt/jetty
mv jetty-hightide-7.4.5.v20110725/* /opt/jetty
#add a user for security reasons one should not run as root
useradd jetty
#change permissions
chown -R jetty /opt/jetty
chmod -R ugo+rw /opt/jetty
mkdir -p /var/log/jetty
chown jetty /var/log/jetty -R
#create an jetty config file
touch /etc/default/jetty
vi /etc/default/jetty

#set in this file
DEBUG=1
JAVA=$JAVA_HOME/bin/java
JETTY_HOME=/opt/jetty
JETTY_LOGS=/var/log/jetty
JETTY_PORT=8080 #we will change this later
JETTY_USER=jetty #we will change this later

#add t server startup init levels
update-rc.d jetty defaults

#ok after this jetty is ready to start "/etc/init.d/jetty start" so test it under port 8080 before proceeding

Now to the second part: enable port 80 setuid feature
#move the seuid jar to a different location since it is at the wrong one in the hightide package (see [5] for a why)
cp /opt/jetty/lib/setuid/jetty-setuid-java-7.4.5.v20110725.jar /opt/jetty/lib/ext/


#open /etc/default/jetty again and add the following line:
JETTY_SETUID=/opt/jetty/etc/jetty-setuid.xml
#change the following line:
JETTY_PORT=8080 => JETTY_PORT=80
#this is f**** crucial and took me a long time: you have to start jetty now as "root" user but it will actually set
#the jetty user as owner of the jetty server...without setting to root the setuid feature will not work
JETTY_USER=root

#now open /etc/init.d/jetty
#after those lines:

#####################################################
# Add jetty properties to Java VM options.
#####################################################
JAVA_OPTIONS+=("-Djetty.home=$JETTY_HOME" "-Djava.io.tmpdir=$TMPDIR")

[ -f "$JETTY_HOME/etc/start.config" ] && JAVA_OPTIONS=("-DSTART=$JETTY_HOME/etc/start.config" "${JAVA_OPTIONS[@]}")


#insert the following lines:

##################################################
# enable setuid
##################################################
if [ -z "$JETTY_SETUID" ]
then
JETTY_SETUID=
fi


#change the line: RUN_ARGS=(${JAVA_OPTIONS[@]} -jar "$JETTY_START" $JETTY_ARGS $"${CONFIGS[@]}") to

RUN_ARGS=(${JAVA_OPTIONS[@]} -jar "$JETTY_START" $JETTY_SETUID $JETTY_ARGS $"${CONFIGS[@]}")


#now go back to the shell
id jetty
#write out for uid for example mine was: uid=1000(jetty) gid=1000(jetty) groups=1000(jetty)
vi /opt/jetty/etc/jetty-setuid.xml
#insert following code (replace USERID with uid from the command above)
#actually the original description on jetty homepage [3]does no longer work for hightide (was written for jetty6)
#one has to change the XML attribute id from tag Configure from "Server" to "org.eclipse.jetty.server.Server"
#otherwise there will be errors (thanks the post on [4])


<Configure id="org.eclipse.jetty.server.Server" class="org.mortbay.setuid.SetUIDServer">
<Set name="uid">UID</Set>
</Configure>

#now change the following lines using your actual uid of user jetty with the lines above:

<Configure id="org.eclipse.jetty.server.Server" class="org.mortbay.setuid.SetUIDServer">
<Set name="uid">1000</Set>
</Configure>


chown jetty /opt/jetty/etc/jetty-setuid.xml

restart jetty and then port80 will work (/etc/init.d/jetty restart)
You can make proof of this by going to the stderr logfile less /var/log/jetty/20xx_xx_xx.stderrout.log after you restarted the server and there you will see:

2011-08-03 10:26:18.478:INFO::Started SelectChannelConnector@0.0.0.0:80 STARTING
2011-08-03 10:26:18.479:INFO::Setting UID=1000
2011-08-03 10:26:18.487:INFO::jetty-7.4.5.v20110725


Note:
In any case there are errors always "tail" the "/var/log/jetty/" start.out and error log files. Also for some errors produced by startup script
its best to debug the jetty init script, see [2] for a very good guideline to do so!


Sources:
[1]http://webcache.googleusercontent.com/search?q=cache:-YW2xPMZYk0J:ubuntuforums.org/showthread.php%3Ft%3D466143+jetty+init+script&cd=1&hl=de&ct=clnk&gl=de&client=firefox-a&source=www.google.de
[2]http://greenash.net.au/thoughts/2011/02/solr-jetty-and-daemons-debugging-jettysh/
[3]http://docs.codehaus.org/display/JETTY/port80
[4]http://dev.eclipse.org/mhonarc/lists/jetty-users/msg00787.html
[5]http://groups.google.com/group/cometd-users/browse_thread/thread/8ae7677f60c5100b

Dienstag, 21. September 2010

How to install Centos 5.5 on any GPT partition table harddrive by patching the CentOS 5 anaconda installer

Centos is a free derivate of the most used server linux red hat (commercial).
Therefore I do not understand why the Centos people have disabled GPT
support for their latest Centos 5.5 release because almost every modern
server have big raid disks which often are bigger than 2.2 TB so no msdos
partition table can be used here....
They have disabled it because Centos uses an old Grub version which cannot handle
GPT tables thats all....in general the CentOS 5.5 installer called anaconda can install CentOS on GPT tables (as you will see).
But there are ways to fix this limitations on your own.
I first heard about it from Richards blog where he showed a nice way on how to install Centos 5.0 on large GPT partitions because the CentOS 5.0 version did not check for GPT tables
and he uses a patched Grub from the LinuxRescueCD Project to fix the grub (which does not support GPT) installed by centos.
So this just works like a charme in most cases.

But unfortunately Richard's approach didn"t work on my HP proliant DL 380G6 Server. As I need to install Centos 5 on our servers and I could not install Centos5.0 because the smart array raid system build into the server hardware is not supported from the centos5.0 kernel I
just found out another approach on my own on how to install centos5.5 on every machine.
As I am mainly a programmer and not a system administrator it was very easy for me to tweak the anaconda installer routine (installer scripts are written in python) a bit to let me and possible you reading
this install centos5.5 on any gpt tables disk. So tweaking anaconda was the easy part but understanding the anaconda installation cd build process in the first plance, understanding anaconda concepts such as buildstamps, rpm packaging, re-generating new installer and generating a new cd was the harder part for me :-) (I am not a linux guru....yet)

Here is a screenshot of what happens if you try to install Centos > 5.0 on a machine with a GPT partitioning table.
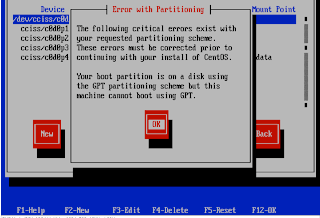

Everything works fine at the begin of the installation but when it comes to partitionating your harddrive the following error occurs:
"The following critical errors exist with your requested partitioning scheme. These errors must be corrected prior to continuing with your install of CentOS. Your boot partition is on a disk using the GPT partitioning scheme but this machine cannot boot using GPT."
and you cannot go on!

So the solution is to get rid of this error message in the anaconda installer by modifing the anaconda installation code.

Here are an overview of the concept and steps I used.
1. First partitionate your GPT harddisk using a linux rescue disk ...(mklabel gpt etc....)
you can read richards blog on how to do this in general.
2. I use a virtualbox environment to hack the centos5.5 installer (anaconda),
you can also use a normal centos5.5 install but for tweaking and hacking
I find a virtual environment more safe as to worki on a real install
as you can mess around without any side-effects.
2a) Install Centos5.5 in a virtual environment or boot up a normal installation.
if you install it new for this purpose, deselect all packages, choose custom
and select:
Development libs, Development tools, Editors...
you only need to install anaconda, a text editor and the squash fs system support..... you do not need more
3) mount the centos5.5 installation cd and modify the anaconda pyhton code
4) rebuild the installation cd...we will create a bootable iso
5) install centos5.5 with the new modified installer...no gpt errors will occur and installation can be made
6) after installation of centos5.5 you will have to patch the grub loader
7) reboot into your new centos5.5 working on a gpt table and enjoy

Here are all the EXACT steps I did.

after booting up a centos5.5 installationand login as root use the following commands:

#some prequisites
#change to homedir first
cd
yum install anaconda anaconda-runtime anaconda-helper
PYTHONPATH=/usr/lib/anaconda
PATH="$PATH:/usr/lib/anaconda-runtime"
#choose your arch: i386 or x86_64
ARCH=x86_64
BUILDBASE=`pwd`
mkdir -p $BUILDBASE/linux/$ARCH/SRPMS

#insert and mount the first centos5.5 install cd in your centos5.5 installation
mkdir /media/cdrom
mount /dev/cdrom /media/cdrom
#make a copy we can edit
rsync -avr /media/cdrom/ $BUILDBASE/linux/$ARCH
#now mount the full anaconda suite from the installation cd into a new directory
mkdir /media/anaconda

mount -o loop -t squashfs $BUILDBASE/linux/$ARCH/images/stage2.img /media/anaconda
#copy the anaconda mount to a place we can edit
mkdir $BUILDBASE/anaconda
rsync -avr /media/anaconda/ $BUILDBASE/anaconda to get rid of the GPT check
#now edit the following anaconda python script file:
emacs $BUILDBASE/anaconda/usr/lib/anaconda/partitions.py

#In the editor go to line:1082 and change:


errors.append(
_("Your boot partition is on a disk "


change to=>
warnings.append(
_("Your boot partition is on a disk "
#After that save and close the editor.
#now back at the shell do:

yum install squashfs-tools
cd $BUILDBASE/anaconda
mksquashfs . ../stage2.img

#backup original stage2
mkdir $BUILDBASE/backup
cp $BUILDBASE/linux/$ARCH/images/stage2.img $BUILDBASE/backup

#now rebuild the cd
DISCINFO=`head -1 $BUILDBASE/linux/$ARCH/.discinfo`
createrepo -u “media://$DISCINFO” -g $BUILDBASE/linux/$ARCH/repodata/comps.xml $BUILDBASE/linux/$ARCH/

#copy the new stage2 we generated to the cd installation
cp $BUILDBASE/anaconda/../stage2.img $BUILDBASE/linux/$ARCH/images/stage2.img

#now make a new iso
ISOFILENAME = $BUILDBASE/c5.5-custom.iso
cd $BUILDBASE/linux/$ARCH
mkisofs -r -R -J -T -v \
-no-emul-boot -boot-load-size 4 -boot-info-table \
-V “Centos 5.5 GPT fix″ -p “Oli P” \
-A “Centos 5.5 GPT fix - 2010/21/09″ \
-b isolinux/isolinux.bin -c isolinux/boot.cat \
-x “lost+found” -o $ISOFILENAME $BUILDBASE/linux/$ARCH

implantisomd5 $ISOFILENAME

#transfer the iso to a place where you can use it in virtual box or burn the cd of it

Now partitionate your GPT harddrive with a Linux resue CD or pmagic linux cd see Richards Blog for an overview
(Install CentOS onto large partitions using gpt disk layout).
#boot the rescue cd
#select your harddrive e.g. /dev/sda or when using pmagic cd: /cciss/c0d0 etc.
#here is my configuration of parted
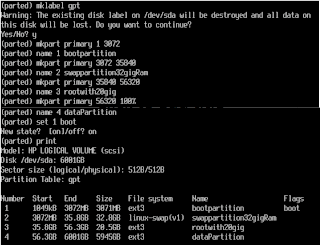
#after setting up partitons quit parted "type q" and in the shell format your new partitions as follow:
mkfs.ext3 /dev/sda1
mkfs.ext3 /dev/sd3
mkswap /dev/sda2
#the last partition "data" will take a long time so pick up a coffee.....
mkfs.ext3 /dev/sda4

reboot and insert the modified Centos 5.5 installer cd.
At the Welcome to CentOS 5.5 screen press OK :-D
Choose Language and keyboard layout.
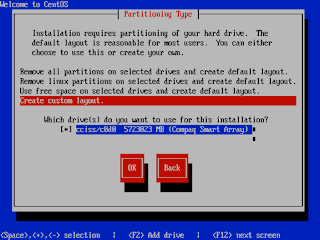
Now at the next screen "Partitioning type" choose "Create custom layout".

Select the partitons and create mount points (/boot,/,/data etc.) but do not chose format, leave this because you have already formatted everything.
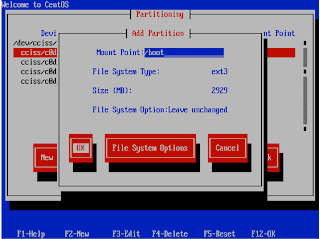
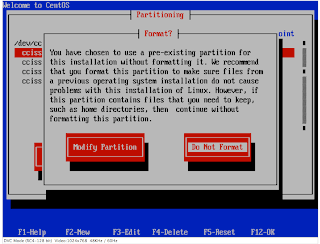
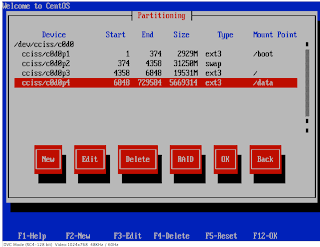

And now the next screen:
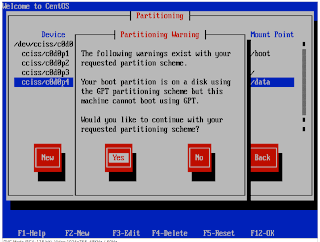
oh no this thing didnt work....did it?
If you watch closely and compare to the original message at the beginning of this document you will see a difference in the heading: it was "Error" no it is "Warning" and we have a "YES" button to continue!!!
Error will stop the installer going any further, warning message can be ignored and you can go on in the installer!!! So click OK NOW!

So you will no longer get the Error that you cannot do this on a GPT table....but instead get a nag screen with a warning only :-) ...successfully hacked...because its a warning only the system let you continue
installing !!!!!
so next steps are to Install Centos:
Next important steps are "Use Grub Boot loader" and after some other steps the next important step is "Boot Loader Configuration".

Question is "Where do you want to install the boot loader?" HEre you have to chose "First sector of boot partition" THIS IS IMPORTANT
DO NOT INSTALL IT IN THE MBR!! WE USE BOOT SO WE CAN FIX IT LATER!!!
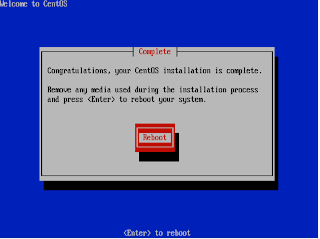
After Installation has finally finished remove Centos5.5 cd and insert RescueCD and reboot to fix the GRUB.
If you boot without fixing grub the boot partition and grub will just not be recognised so you have to do the following steps....

I fixed it using the steps at http://www.rodsbooks.com/gdisk/booting.html (section Linux, GRUB, and LILO) because the instructions at
http://www.sysresccd.org/Sysresccd-Partitioning-EN-The-new-GPT-disk-layout (section Installing a patched Grub-0.97) did not produce fast results.
Here are my commands:
at sysrescue bootup chose your architecture type (I use 64-bit kernel with standards).
Then when you got a shell type:

#instructions from site:http://www.rodsbooks.com/gdisk/booting.html (section Linux, GRUB, and LILO)
#copy the boot partition from the live cd to a safe place

mv /boot /boot_livecd
mkdir /boot
#my boot partition is on sda1 to find out yours: parted with print command
mount /dev/sda1 /boot
#make a backup of grub...in a worst case scenario...always make a copy of this... never just move to grub!
cp -r /boot/grub /boot/grub_original
#edit /boot/grub/devices.map and replace entry "cc0011/c0d0" with "sda"...in general replace your harddisk device name with sda
nano /boot/grub/devices.map
#now install the fixed grub from the rescue cd on your boot partition
grub-install /dev/sda
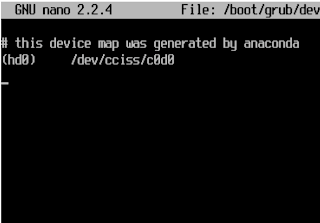


this was the file /boot/grub/devices.map showing before editing
you have to replace your actual device name with sda so in my case the complete new
line will be (without the quotes):
"(hd0) /dev/sda"

after running grub-install you should get the following success status:
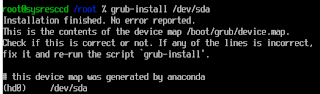
reboot....your gpt table will load and finally centos5.5 is working!!!


Note: I can share the modified installer CD on a one-click-hoster if there is high demand for it.

References:
[1] Distribution Hacking 101: disecting anaconda, http://k12linux.mesd.k12.or.us/at/roswell-ltsp.html
[1] Build a custom CentOS 5 install CD, http://www.sirius.pe.kr/v5/tt
[3] Install CentOS onto large partitions using gpt disk layout, http://richardjhblog.wordpress.com/2010/08/25/install-centos-onto-large-partitions-using-gpt-disk-layout/
[4] Booting from GPT (Linux, Grub and Lilo), http://www.rodsbooks.com/gdisk/booting.html

Dienstag, 7. September 2010

How to install Centos 5 onto large partitions using GPT layout (HP proliant DL 3xx G6 server system)

UPDATE: this approach is deprecated and does not work on SINGLE GPT partitions bigger
than 2.2 TB.
Use my updated guide to install Centos5.5 instead:
http://oliverpelz.blogspot.com/2010/09/how-to-install-centos-55-on-any-gpt.html

I completely wasted a lot of time trying to get Centos5 running on some HP proliant server system.
After reading endless tutorials and tips I gave up...none of them worked...its impossible (at the moment) to install Centos5.x on a GPT system like mine (as others also stated).
In the end after partitoning or doing installer tricks such as erasing MBR with dd to pass the GPT check etc. I always stuck at the point that the installer does not recognize my smart array HP raid5.
So after all this approaches do not work I found the following solution:

-Install centos 4.8 which works perfectly well with GPT layout.
But before you can do this you have to upgrade your firmware to the latest edition because otherwise centos anaconda installer will fail with some GPT/MSDOS recognition problems.
-So I updated my clusters which come with a firmware from march2010 to the latest 9.03.

-Use a boot partition and install grub in this partition.
-After installation of some base packages immediately put in the latest linux rescue cd (http://www.sysresccd.org) and install new grub with GPT support because the one shipped with 4.8 does not support GPT partitions and grub will not load (red screen of death) the system.

Immediately after installation has finished installing insert linux rescue cd, reboot, I have 64 so chose 64bit version from the rescue cd menue and install a patched grub with gpt support:

mv /boot /boot_livecd
mkdir /boot
mount /dev/sda1 /boot (my boot partition is on sda1 to find out yours: parted /dev/sda print)
#make a backup of grub...for worst case scenario..
cp -r /boot/grub /boot/grub_original
edit /boot/grub/devices.map and replace entry "cc0011/c0d0" with "sda1"
grub-install /dev/sda
reboot

grub will work and load the OS

Reboot and update your centos installation from 4 to 5 using a good other tutorial which can be found plenty of on the net.

Dienstag, 20. Oktober 2009

Caused by: org.hibernate.MappingException: Could not determine type for: XXX, at table: XXXX, for columns: YYYY

This is a common hibernate mapping exception and in most cases you simply forgot to implement

toString()
hashCode()
equals()

in your class you are using a relation to another class (only when using annotations)

Another thing what could be the cause of this could be to mix the annotations between above the fields and above the getter MEthods.
Try to put all the annotations consistent above the getter methods AND not above the data fields.

So:
instead of :
@Id
@GeneratedValue(strategy = GenerationType.AUTO)
@Column(name = "count")
public long id;

public long getId() {
return id;
}

alter all of them to:


public long id;

@Id
@GeneratedValue(strategy = GenerationType.AUTO)
@Column(name = "count")
public long getId() {
return id;
}

Mittwoch, 14. Oktober 2009

Running Jetty 5 under Ubuntu 9.04 Jaunty

Ok another weird thing just happened.
I have installed jetty5 and some war applications via jetty webapps folder as also via maven2 jetty plugin but just cant connect through any webbrowser via localhost:8080 (mvn2) or localhost:8280 (jetty). So i tried and tried but just cant connect to it. Here is what happened: Though jetty describes itself as a complete full integrated http webserver I think it is not configured right on ubuntu because i just found out that you need to install apache2 package in order to run localhost jetty applications!

Sonntag, 15. Februar 2009

Using Joomla and the Strato website provider

Today I had the problem that I had to alter my php.ini because the joomla pony gallery plugin needed extra memory when generating thumbnails and the strato memory size was too low for processing.

So I did some research and found out that Strato allows own php.ini files which can overwrite their values. Problem was only that I could not get my own php.ini to work with the website or backend, I got a lot of internal server failures. So I did some research again and here are the correct settings to use own customized .htaccess and php.ini:

create a .htaccess in your root dir :
Directoryindex index.php , index.htm, index.html
AddType application/x-httpd-php5 .php .php4 .php3 .php5
next create a php.ini in your root dir and in your administrator dir where you now do what you like and it actually will work:

register_globals = Off
safe_mode = Off
memory_limit = 16M
upload_max_filesize = 10M
max_execution_time = 30
max_input_time = 60
so have phun with this!!

Sonntag, 27. Januar 2008

Using VPN in Ubuntu 7.10

Today I tried to get a VPN connection to my university to work.

So first I tried to make the connection over ubuntu's network manager using the vpn-plugins.
Therefore I installed the plugins described in the ubuntuusers wiki:
  • network-manager-pptp

  • network-manager-openvpn

  • network-manager-vpnc


After I installed and configured everything and loading my universities config file the whole network manager crashed when I tried to connect to the vpn-network. Looking into /var/log/syslog I recognised something:

Jan 27 14:29:36 xxx NetworkManager: file nm-vpn-service.c: line 475 (nm_vpn_service_stage3_connect_cb): assertion failed: (service != NULL)


O.k. googling some time I find out this is a unresolved bug.

So okay then what next??

Next thing I did was trying to install cisco-vpn-client. Trying to compile it failed with a lot of compile errors
/xxx/vpnclient/linuxcniapi.c: In Funktion »CniInjectReceive«:
...
Fehler: »struct sk_buff« hat kein Element namens »nh«


Ok, after searching the internet again I found out that Cisco doesn't update this package with every kernel release.
There are some sites out there which offering patches but I thought to myself that I would not install bugfixes to vpn software out of security reasons from private non-offical sites.

So, okay what then.
Then I found out about vpnc terminal client.
So I installed it via apt and ran it.
After playing around some times I found out that I need to convert my universities pcf file to a fileformat (.conf) which can be read by vpnc.
This can be made with a conversation tool provided by the vpnc packet under:
/usr/share/vpnc/pcf2conf

So after I converted this everything works fine. So forget about other solutions vpnc works perfectly.

have a great time
Oli

Sonntag, 6. Januar 2008

Ubuntu 7.10 (Gutsy Gibbon) Live CD Intel Pro/Wireless 2200 Acer Travelmate 292 radio off problem

Hi everybody,

Yesterday a friend of mine asked me if I could look over his problems with the
new Ubuntu Gutsy Gibbon Live CD (7.10) release regarding the not working
Intel Pro/Wireless 2200 wlan card.
His laptop is an Acer Travelmate 292 and I think it is a notebook specific problem but after I saw that a lot of other people with other laptop brands have the same problems I think this could be interesting for those too.

After booting the Ubuntu live cd could detect and install the modules for this wlan network adapter correctly
and everything under "dmesg | grep ipw2200 " looked fine but I couldn't see any access points although we were in the near of one.

When I looked under "iwlist scan" I saw an interesting
eth1 radio off ESSID:""
line.

So what did this meant? After searching mainly english sites I became aware that this was an common problem without any real solution.
But then I found the solution under the second german hit on google click
so I will explain it in english that hopefully a lot of people can profit from it.

"radio" is the status of your laptops' wireless radio switches, a lot of laptops have those hardware switches to power the wlan card on / off manually. This Acer Laptop model we worked one had an hardware switch on the left side but neither on nor off position changed the situation so it isn't supported it by default.

In the case of the Intel Pro/Wireless 2200 we have a hardware switch which isn't supported by the Live CD's kernel automatically although the correct driver module "ipw2200" was loaded.

So what we have to do is to trigger the card on by software instead of really triggering on by hardware. This is done with the kernel module "Acer Hotkeys" (acerhk kernel module) which means this module can trigger the wlans hardware state on or off.

To do this there is this site CLICK where you can get special parameter settings for the acerhk module for a lot of different acer laptop models:

for our acer model (Travelmate 292) it is :

modprobe acerhk force_series=290 usedritek=1 verbose=1   (loads the kernel module)
echo 1 > /proc/driver/acerhk/wirelessled (powers the hardware really on)

there are a lot of other laptop brands on that site too: Acer,Asus,BenQ,Dell, HP,Samsung, Sony so have a look.

So after doing this "iwlist scan" showed all near access points correctly and could be connected too.

So with this little fix you have a real good Live CD linux with full wlan support on Acer Travelmate 292.

Loading the acerhk (Acer Hotkey) kernel module as shown above is only needed
if you power off your laptop so if you just reboot while the lapton is on you have not to make this again unless you power it manually off with:
echo 0 > /proc/driver/acerhk/wirelessled (switches it on)

have phun

hello world

>Hello world,

I am an bioinformatics student from Germany and would like to use this blog for everything about my studies and work.

I would like to mainly use it for solutions in a lot of computer areas which I have found out and where hard to find in literature or by searching the internet.